
Original 2025 series archive: This documents my first MiniBreaks build journey. For the current direction and updated AI workflow, read the new pivot post.
How I Built MiniBreaks.io With AI
The complete guide to building a full website with AI assistance — from idea to deployment. All 10 parts in one continuous read.
About this article: This is the complete, merged version of the 10-part "How I Built MiniBreaks.io With AI" series. Each part is presented in order below. You can use the floating table of contents (desktop) to navigate between sections.
Can You Really Build a Website with AI?
10 min read
Welcome to my exploration of building MiniBreaks.io with AI. A story of me trying to build a complete website using artificial intelligence as my development partner.
Before I started building MiniBreaks.io, I had one burning question in mind: Can AI help me build a complete website, from concept to deployment?
The short answer is yes. The longer answer? It's not as magical or automatic as it sounds. As someone with years of experience in software engineering, I already had a good sense of what needed to happen—but even for me, the process wasn't exactly plug-and-play.
Here's the thing: AI is incredibly powerful, but it's not a magic wand. It's more like having a really smart assistant who knows a lot about coding but still needs clear direction from you.
The Reality Check
Let me be completely honest with you. When I first started this project, I thought I could just tell an AI what I wanted and watch it build my website. I imagined typing something like "Build me a travel booking website" and getting back a fully functional application.
That's not how it works. At least, not yet.
What I discovered is that AI excels at specific tasks when given clear, focused instructions. Want it to write a function that calculates pricing? Excellent. Need help debugging an error message? Fantastic. Finishing a journal and needs someone to fix your grammar? It's your best friend.
But ask it to "build a website" without specifics, and you'll get overwhelmed with options, suggestions, and complexity that might make you want to give up before you start.
The Overwhelming Start
Initially, I planned to use just one AI tool, but I quickly realized that the landscape is vast and a bit overwhelming. At the beginning, I tried asking ChatGPT to make me a roadmap, but what I got back was… too much.
The AI Overwhelm Problem
AI is very thorough. The plan was long, detailed, and frankly intimidating. It made the whole project feel like a mountain I didn't want to climb.
Here's what that first roadmap looked like:
- Choose a tech stack (React vs Vue vs Svelte vs Next.js vs...)
- Set up development environment (Node.js, package managers, bundlers...)
- Design database schema (SQL vs NoSQL vs...)
- Implement authentication (OAuth, JWT, sessions...)
- Build API endpoints (REST vs GraphQL...)
- Configure hosting and deployment (AWS vs Vercel vs...)
- Set up monitoring and analytics...
And that was just the beginning! Each bullet point had sub-bullet points with more choices, more configurations, more things to learn. It was paralyzing.
The Breakthrough Moment
Eventually, I learned something important: just start. Forget perfection. Build momentum.
Instead of trying to plan everything upfront, I decided to break the project into tiny, manageable pieces. Rather than "build a website for 'something'," I started with "create a simple landing page that promotes positive living."
That one small step led to another, then another. Before I knew it, I was making real progress. The AI tools became incredibly helpful when I gave them specific, focused tasks instead of asking them to solve everything at once.
❌ What Doesn't Work
"Build me a complete travel booking website with all the features"
✅ What Actually Works
"I want the navigation header sticky and a little bit transparent"
What You'll Learn in This Series
In this series, I will walk you through how to use AI to create a complete website, step by step. This series is not only for readers with engineering backgrounds, but hopefully for anyone who is interested in learning to build something with AI.
The Right (Minimum) Tools for the Job
Which AI tools work best for different tasks, from GitHub Copilot for coding to ChatGPT for planning.
Writing Effective Prompts
How to communicate with AI tools to get exactly what you need, not overwhelming lists of possibilities.
When to Manually Intervene
Recognizing when to step in and guide the AI versus when to let it handle things automatically.
Making AI Your Partner
Most importantly, how to work with AI as a collaborative partner rather than expecting it to do everything for you.
This Series Is For Everyone
Whether you're a complete beginner who's never written a line of code, or someone with technical experience who wants to see how AI can accelerate your workflow, this series is designed to be accessible and practical.
I'll explain technical concepts in plain language, show you exactly which buttons to click, and most importantly, share the real challenges I faced and how I overcame them.
My Promise to You
No jargon without explanation. No skipped steps. No "and then magic happens" moments. Just honest, practical guidance from someone who's been through the process.
The Journey Ahead
By the end of this series, you'll have more than just a website. You'll have:
- A new perspective on what's possible with AI-assisted development
- Practical skills you can apply to your own projects
- A toolkit of AI tools and techniques that actually work
- The confidence to tackle bigger, more ambitious projects
But most importantly, you'll understand that building with AI isn't about replacing human creativity and decision-making, it's about amplifying them.
Why I Wanted to Use AI
8 min read
My Original Expectations
Before we formally start the series, I want to let you, the reader, know what my original expectation of using AI was. This transparency is important because it sets the foundation for everything that follows in this series.
The Time Problem
Having built several websites and apps before, I knew how much time even a "simple" project could take. For something the size of MiniBreaks, doing everything from scratch—while juggling a full-time job, would easily eat up a year or more. The endless cycle of:
- Setting up project structure and tooling
- Writing boilerplate code for authentication, databases, and APIs
- Designing and iterating on UI components
- Writing marketing copy and content
- Making countless small design decisions
I'd been through this before. I knew that by month 6, motivation would wane. By month 9, I'd be questioning whether the project was worth continuing. And by month 12, there was a good chance it would join the graveyard of unfinished side projects.
What I Wanted AI to Do
I wanted AI to accelerate the boring parts—the foundation work that every project needs but that doesn't feel particularly creative or engaging:
- Help me bootstrap a well-organized codebase with proper folder structure, configuration files, and initial setup
- Offer quick ideas for UI/UX when I was stuck staring at a blank screen
- Speed up writing copy and generating content for landing pages, feature descriptions, and marketing materials
- Act like a second brain during design decisions, someone to bounce ideas off when I wasn't sure which approach to take
Essentially, I wanted AI to be my development accelerator, not my replacement. I still wanted to make the key decisions, write the critical logic, and shape the product vision. But I hoped AI could eliminate the friction that often kills side projects before they gain momentum.
More importantly, I needed AI to help me finish my project before it becomes another my abandoned project! 🤦♂️
What AI Actually Delivered
AI did all of those things I expected—and occasionally, it did more. Much more.
Beyond My Expectations
For example, AI not only refactored my code using solid architecture principles, it sometimes suggested layouts or visuals better than what I had in mind. It would reuse styles from my existing design system and make smart decisions about what elements to highlight on a new page.
There were moments when I'd describe a feature I wanted, and AI would come back with an implementation that was not just functional, but elegant. It would suggest patterns I hadn't considered, point out potential edge cases, and even recommend user experience improvements.
Along the way, I had a few "aha" moments—like realizing I could ask AI not just to generate code, but to help structure it using best practices. Suddenly, my project folders were clean, organized, and extensible. My components followed consistent patterns. My API endpoints had proper error handling and validation.
The Partnership Shift
The real breakthrough came when I stopped thinking of AI as a tool and started treating it as a development partner. Instead of asking "Can you write a function of doing X?" I began asking something like "Before we go further, I want us to consider our current architecture so it will be more maintainable in the long term?" or "For this feature, but how can we sustain user engagement?"
Over time, I began giving more instructions to AI instead of writing the changes manually. This wasn't because I became lazy; it was because I discovered that articulating my requirements clearly to AI forced me to think more systematically about what I was building.
And that shift, treating AI as a partner rather than a tool, was what really unlocked its value.
The Reality Check
But let's be honest: it wasn't hands-off magic. AI required careful direction, clear communication, and constant quality control. There were moments of frustration when AI would misunderstand requirements or generate code that looked right but had subtle bugs.
I learned that AI amplifies both good and bad practices. If I was unclear in my instructions, I got unclear results. If I didn't understand the problem space well enough, AI couldn't compensate for that gap.
Key Lesson
I need to get my requirements right before asking AI to implement them.
The most successful outcomes happened when I combined my domain knowledge, strategic thinking, and product vision with AI's ability to rapidly generate, iterate, and implement solutions.
Setting Your Expectations
Therefore, I want you to ask yourself a few questions before we continue with the series:
Questions for You
- What do you want AI to do for you? Be specific. Is it about speed? Learning? Handling tasks you find tedious?
- How much are you expecting AI to do for you? 20% of the work? 50%? 80%? What would success look like?
- What are you willing to learn or adapt? Working with AI effectively requires new skills—prompt engineering, quality control, strategic oversight.
- What parts of development do you actually enjoy? AI should amplify the fun parts, not replace them entirely.
Briefly write down your answers. I'd encourage you to come back to these notes halfway through the series and see if everything is meeting your expectations.
The Key Mindset
The most important mindset shift I made was this: AI is not about replacing your thinking, it's about amplifying it.
The developers who struggle with AI are often those who expect it to read their minds or solve problems they haven't fully understood themselves. The developers who thrive are those who use AI to execute their well-thought-out plans more efficiently.
💡 Pro Tip
Start a development journal for this series. Document your expectations now, track your experiences as you follow along, and note what surprises you. This self-reflection will be invaluable for developing your own AI-assisted development style.
Choosing Your Tools & Setting Up
12 min read
Building a website with AI doesn't require a massive toolkit. In fact, starting simple is better—you can always add more tools as you grow. Today, I'll introduce you to just four essential tools that can take you from idea to live website.
Even if you're not an engineer, don't worry! I'll walk you through each step and explain everything in plain language. By the end of this part, you'll have your workspace ready and know exactly how to use AI as your development partner.
The Essential AI Tools You Need
After trying dozens of AI tools, I've narrowed it down to these four essentials. Each serves a specific purpose, and together they create a powerful development workflow:
💬 ChatGPT
Your AI brainstorming partner and problem solver
⚡ GitHub Copilot/Cursor
Your AI coding assistant that writes code as you instruct it
🤗 Hugging Face
Free AI models for advanced features such as designing (optional)
📁 GitHub
Where your code lives and how you deploy your site
ChatGPT - Your AI Assistant
Think of ChatGPT as your patient mentor who never gets tired of explaining things.
ChatGPT will be your primary brainstorming partner. Here's how I use it:
- Idea refinement - "Help me think through this website idea..."
- Learning new concepts - "Explain how websites work in simple terms"
- Problem solving - "My code isn't working, here's what's happening..."
- Writing content - "Help me write an introduction about my website."
GitHub Copilot - AI Code Companion
If ChatGPT is your mentor, GitHub Copilot is your coding buddy who sits next to you and helps write the actual code. It integrates directly into your code editor and suggests code as you type.
When using GitHub Copilot, make sure you configure it to use the Agent mode, which allows it to understand your code context better and provide more accurate suggestions.
Cursor IDE - AI-First Code Editor
Cursor is like a supercharged code editor built specifically for AI assistance. It's what I used to kick off MiniBreaks.io, and it's completely free.
My recommendation: Start with Cursor (free), do as much as you can in the first 2 weeks, and add GitHub Copilot later if you want even more AI assistance.
Hugging Face - AI Models Hub (Optional)
Think of Hugging Face as a library of free AI tools (check Hugging Face Space). You might not need it for your first website, but it's good to know it exists.
Setting Up Your GitHub Account
GitHub is where your code will live and where you'll deploy your website. Think of it as a combination of Google Drive for code and a free web hosting service.
Creating Your GitHub Account
Head to github.com and click "Sign up for GitHub". Choose a username that represents you or your project.
Creating Your First Repository
A repository (or "repo") is like a project folder for your website:
- Click the green "New" button on your GitHub homepage
- Name your repository (try "my-first-website")
- Check "Add a README file"
- Click "Create repository"
Preparing Your Workspace
Local Development Setup
While you can edit code directly on GitHub, it's better to work locally on your computer. Here's the minimal setup:
- Download Visual Studio Code - Visit code.visualstudio.com
- Sign up for GitHub Copilot - Go to github.com/features/copilot
- Download Cursor IDE (Optional) - Visit cursor.sh
- Sign up for ChatGPT - Go to chat.openai.com
- Install Git - Download from git-scm.com
Your AI-Assisted Workflow
Plan with ChatGPT
Brainstorm and plan your feature
Code with Cursor
Write code with AI assistance
Deploy to GitHub
Push your changes live
Your Homework
Before we move to the next part, complete these simple setup tasks:
⚠️ Important about Cursor: If you've never registered for Cursor before, do NOT register yet! Wait until Part 5 so you can take advantage of the 2-week trial when you actually start coding.
Crafting Your Idea & MVP with AI
10 min read
You might wonder: why do I even need help crafting an idea when I already have AI at my fingertips?
That's a fair question. But here's the catch: while AI is great at generating ideas, it can also overwhelm you with too much information or lead you down overcomplicated paths.

In fact, one of the best lessons from the book Scalability Rules: 50 Principles for Scaling Web Sites is this:
Don't overengineer the solution.
Overthought ideas → Overengineered solutions.
That's what we want to avoid.
Why AI Brainstorming Matters
When I started building MiniBreaks.io, my initial idea was much more complex than what I eventually launched. The AI tools were happy to help me plan all of this!
But that's exactly the problem. AI will enthusiastically help you build a complicated solution when what you really need is to start simple and prove your concept first.
The key is learning how to guide AI toward simplicity rather than complexity. This requires strategic prompting and clear boundaries.
3 Guidelines for Brainstorming with AI
When you brainstorm your website idea with AI, keep these principles in mind:
Make it clear you want an MVP
Tell AI explicitly that you're looking for a Minimum Viable Product. This keeps the scope small and achievable.
Give it options
Describe your idea with a few feature options. Let AI help you weigh which feature delivers the best ROI.
Focus on business needs
If you don't frame your request around business needs, AI will behave like an overanxious parent — giving you way more technical details than you need at this stage.
Using ChatGPT Projects for Better Results
If you're using the paid version of ChatGPT, create a Project for this brainstorming session.
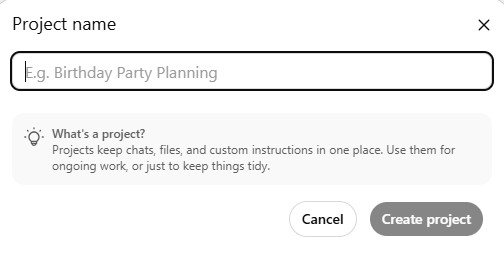
Why? Because you can define the tone and role AI should play for you.
Project Instructions:
"I'd like you to act as my co-founder and brainstorming partner. Please focus on creative yet practical business ideas for a new website, aiming for MVP."
Cross-Reference for Confidence
One final tip: don't be afraid to cross-reference ideas with other AI tools. This can boost your confidence and give you different perspectives.
💡 Pro Tip: If two different AI tools give you similar advice, you're probably on the right track. If they disagree significantly, dig deeper to understand why.
Common Pitfalls to Avoid
AI will give you enterprise-level architecture when you need a simple landing page.
Without deadlines, AI will suggest features that take months to implement.
Focus on one specific user with one specific problem, not everyone with every problem.
Your Homework
📝 Example MVP: "MiniBreaks.io is a playful website encourages taking mindful breaks, promotes workplace well-being, and fosters a sense of fun through achievements and leaderboards."
Designing Your UI/UX with AI
12 min read
In this part, you'll learn how to kick off your project by generating a real, working design with AI.
The way I started with Minibreaks was using DeepSite, a powerful tool that can generate beautifully designed landing pages from simple text prompts. This becomes the foundation of your site's design system.
Introducing DeepSite
DeepSite is available at: https://huggingface.co/spaces/enzostvs/deepsite
This is completely free, but with very limited number of uses. But if you get your prompt right, you should get what you want with one or two attempts.
Keep in mind:
This HuggingFace workspace does not build a complete website. Instead, it generates a beautifully designed landing page (homepage) to serve as the foundation of your site's design system.
Getting Your Domain Name
Before we continue, you actually need another thing: a domain name. This is important because you should include it in the prompt when generating your website design.
Here I will use one of my ideas (that I am not going to pursue as an example...😏) to create a prompt. The motivation is that I have some old toys that I do not want to keep and I want to sell them to people who really like them.
Crafting Your Design Prompt
Here is the prompt I am using for DeepSite:
Design a clean, premium homepage for a collectibles marketplace called "collectibles.sale", focused on serious collectors selling rare vintage toys and comics. The site should feel professional and aspirational, with a modern, minimal aesthetic, neutral/dark tones, and elegant typography. Key MVP features to highlight: a hero section with a strong headline and CTA to list or browse items, a "Featured Listings" grid showing rare toys and comics with clear photos, a simple search bar, category filters (e.g., Vintage Toys, Comics), and a "How it Works" section in 3 steps. Design for mobile-first, uncluttered, and serious.
Notice how specific this prompt is about:
- Brand positioning: "serious collectors," "professional and aspirational"
- Visual style: "modern, minimal aesthetic, neutral/dark tones"
- Key features: Specific sections and functionality
- Target audience: Clear about who this is for and what to avoid
The Generated Result
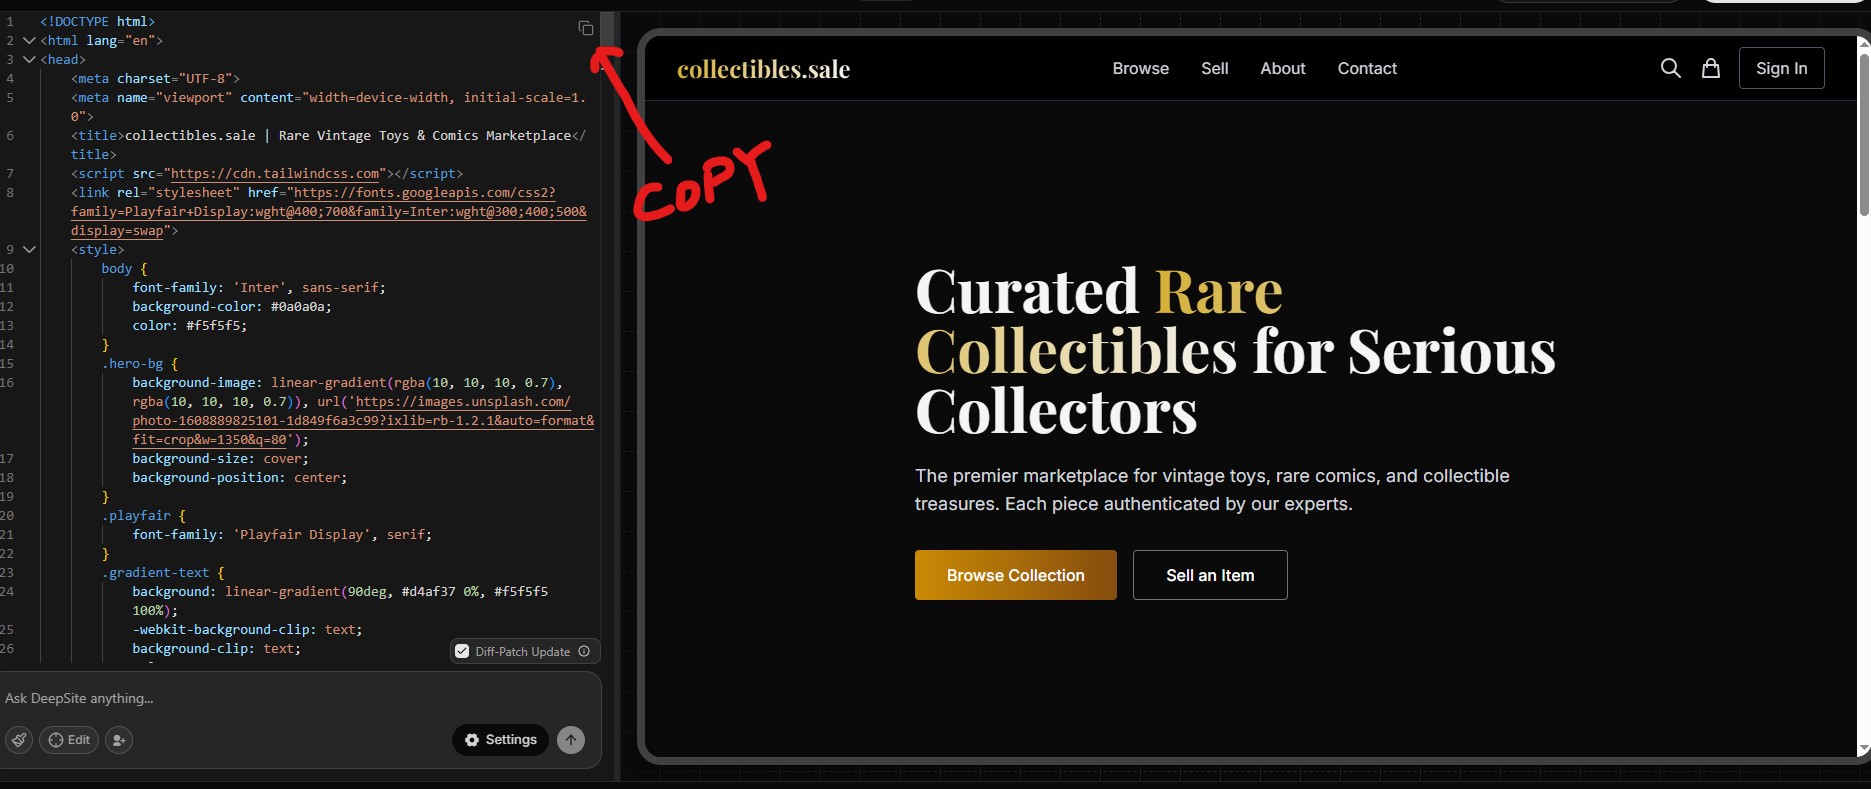
You can also visit my HuggingFace space to view this generated page: https://huggingface.co/spaces/hongincanada/collectibles-sale
Honestly, it's a very good starting point. Copy the source code, and create a new file in your local machine, call it generated.html, paste the entire code. We will use it in the next section.
Technical Notes
It uses Tailwind CSS v3, a popular utility-based framework for styling. Tailwind v4 exists now, but v3 is still perfectly fine for a prototype.
The page references Tailwind via a CDN — this is great for testing but not recommended for production.
Your Homework
generated.htmlWriting Code with AI Assistance
15 min read
In this part, you'll learn how to transform your generated design into a structured, maintainable website using AI as your coding partner.
Up to this point, you've created a beautiful static HTML page using DeepSite. Now it's time to turn that into a proper web application using modern development tools and AI assistance.
🧰 Choosing Your Tech Stack
Before diving in, you'll need to pick a tech stack — which simply means the combination of technologies you'll use to build your website.
Why not just stick with vanilla JavaScript?
Vanilla JavaScript works great for adding simple user interactions, animations, and maintaining user state. However, as your website grows, it becomes hard to maintain and scale.
My recommendations: SvelteKit for frontend, Tailwind for CSS, PostgreSQL for database (when needed later).
Why SvelteKit?
1. Beginner-friendly yet powerful
SvelteKit is full-stack out of the box — it handles routing, server-side rendering (SSR), and builds a performant website without much setup.
2. Fast and lightweight
SvelteKit compiles into highly-optimized vanilla JavaScript, avoiding the runtime overhead of virtual DOM used by React or Vue.
3. Better AI experience
SvelteKit is newer and has a simpler ecosystem. AI tools are less likely to generate outdated or incompatible code compared to React or Vue.
🖥️ Setting Up Your Environment
Make sure you have Node.js and Git installed.
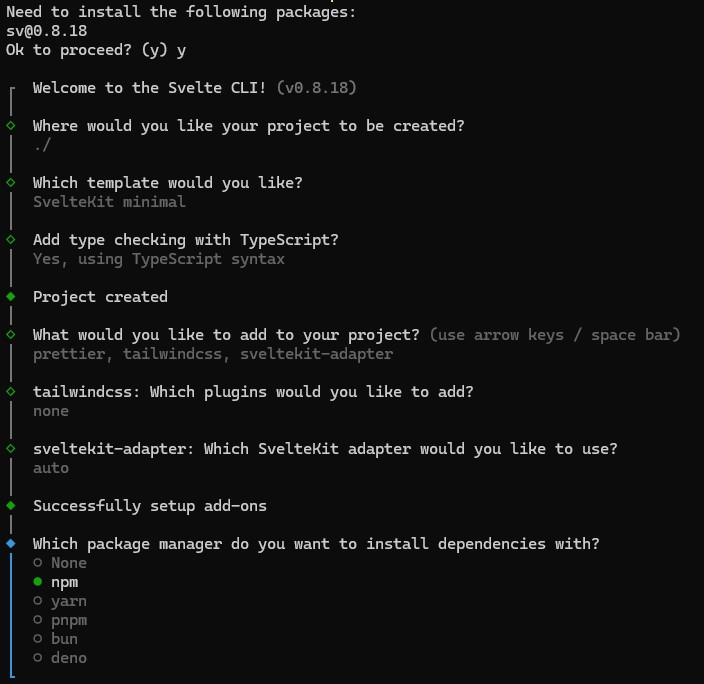
Create a SvelteKit project
npx sv create my-appThis uses the new Svelte CLI to scaffold your project. Follow the prompts — don't worry too much about advanced options right now.
📝 Example of selected options
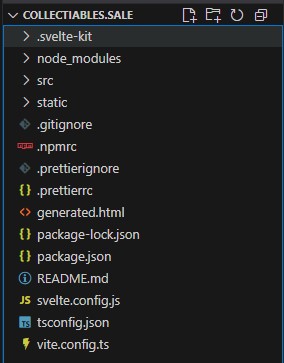
🗂️ Moving Your Generated Design
Take the generated.html file you created in the previous part and drop it into the root of your SvelteKit project folder.
📁 Folder Structure
🤖 Your First AI Prompt
Now it's time to let AI help you turn that static HTML into a proper SvelteKit site.
- Break the page into separate components: header, footer, hero, and other sections.
- Convert all JavaScript to TypeScript.
- Ensure components are reusable.
- Create at least one additional page (e.g., About) using the same design system.
AI-Powered Migration to SvelteKit
Let AI generate and organize the code for you. You should see results like:
- A structured project with
src/routes/+page.svelte(your homepage) - An About page at
src/routes/about/+page.svelte - Reusable components in
src/lib/components/ - All JavaScript converted to TypeScript
✨ The Magic Moment
You now have a structured, maintainable project with a home page, an about page, and reusable components — making it easy for AI (and you) to expand further.
Extending Your Site with AI
From here, you can prompt AI with simple requests like:
🎯 Best Practices for AI-Assisted Coding
Be Specific with Context
Always include relevant files in your AI context. The more context AI has about your existing code structure, the better it can maintain consistency.
Break Down Complex Tasks
Instead of asking AI to build an entire feature, break it into smaller components. Ask for one component at a time, then integrate them.
Iterate and Refine
Don't expect perfection on the first try. Use follow-up prompts to refine styling, improve accessibility, or add missing functionality.
📝 Homework
npm run dev) and explore the result!Adding Advanced Features with AI
15 min read
🚀 Ready to Level Up?
Congratulations! You've built the foundation of your website and learned how to work effectively with AI for coding. Now it's time to add the features that will make your site truly functional and professional.
In this part, we'll cover:
- Setting up a database - Your website's memory bank
- Creating a user table - Managing user accounts
- Implementing authentication - Secure login and signup
- Adding password recovery - Using an email API for user support
📊 What is a Database?
Think of a database as a digital notebook that stores all your website's important information neatly organized into tables. Each table is like a spreadsheet with rows and columns.
Table
Like a sheet in Excel where you store related information.
Column
Like headings on your sheet (e.g., username, password, email).
Row
Each individual record (each user's data).
🧰 Setting Up PostgreSQL
PostgreSQL is a reliable and free database system. Follow these steps:
How to Install PostgreSQL
- Go to PostgreSQL Download
- Download and follow the installation guide
- Set a password during installation (save this password somewhere secure!)
- Install pgAdmin (a graphical tool that comes with PostgreSQL)
- Open pgAdmin and create a new database
🗃️ Creating a User Table
We'll use AI to help us create the table. Here's how to ask clearly:
-- user table for the website
CREATE TABLE users (
    id SERIAL PRIMARY KEY,
    username VARCHAR(50) UNIQUE NOT NULL,
    password_hash VARCHAR(255) NOT NULL,
    email VARCHAR(100),
    created_at TIMESTAMP DEFAULT CURRENT_TIMESTAMP
);
Pro Tip: Always store password hashes, never plain text passwords!
🔑 Building Authentication Step-by-Step
To help AI generate accurate results, let's break down the authentication feature into multiple prompts.
Step 1: Sign-Up Page
"Create a simple sign-up webpage that asks users to create a username and password. Include an optional field for email. Use modern styling and include proper form validation."
Step 2: Login Page
"Create a basic login page where users can enter their username and password to log in. Include a 'Remember me' checkbox and a link to password recovery."
Step 3: Password Recovery Page
"Create a page that lets users recover their password by entering their email. For now, just create the form and logic, but leave the email sending functionality as a placeholder."
🔐 Connecting Email Sending with an External API
We'll use the Brevo API to enable our website to send emails. Brevo (formerly Sendinblue) offers a reliable, free tier that's perfect for getting started.
Setting Up Brevo API
- Visit Brevo API documentation
- Sign up for a free account and get an API key
- Keep your API key secure
Using AI to Complete Email Integration
"Complete the password recovery feature by using Brevo transactional email API. Send a password reset link to the user's email address when they request it."
⚠️ Important: Explicitly call out to use the API, otherwise AI may pull a different framework, which is usually a wrapper. In my experience, AI pulled a deprecated library and it didn't work. 😫
🛡️ Security Best Practices
Password Security
- Always hash passwords before storing them
- Never store passwords in plain text
- Enforce strong password requirements
API Key Security
- Store API keys in environment variables
- Never commit API keys to version control
- Use different keys for development and production
📓 Homework
Before Deployment: Testing & Preparation
12 min read
Introduction
Congratulations on reaching this stage! You've successfully created an MVP. Now comes a crucial phase that many developers overlook: preparation for deployment.
This isn't just about making your website "go live" – it's about ensuring your users have a smooth, secure, and enjoyable experience from day one.
Testing Your Website
Testing ensures your website functions correctly and provides a good user experience.
Manual Testing
For personal projects and MVPs, thorough manual testing is often sufficient:
- Start your development server: Run
npm run dev - Test systematically: Test every page, button, form, and feature
- Check different scenarios: Try invalid data, edge cases
- Test user flows: Go through complete journeys from start to finish
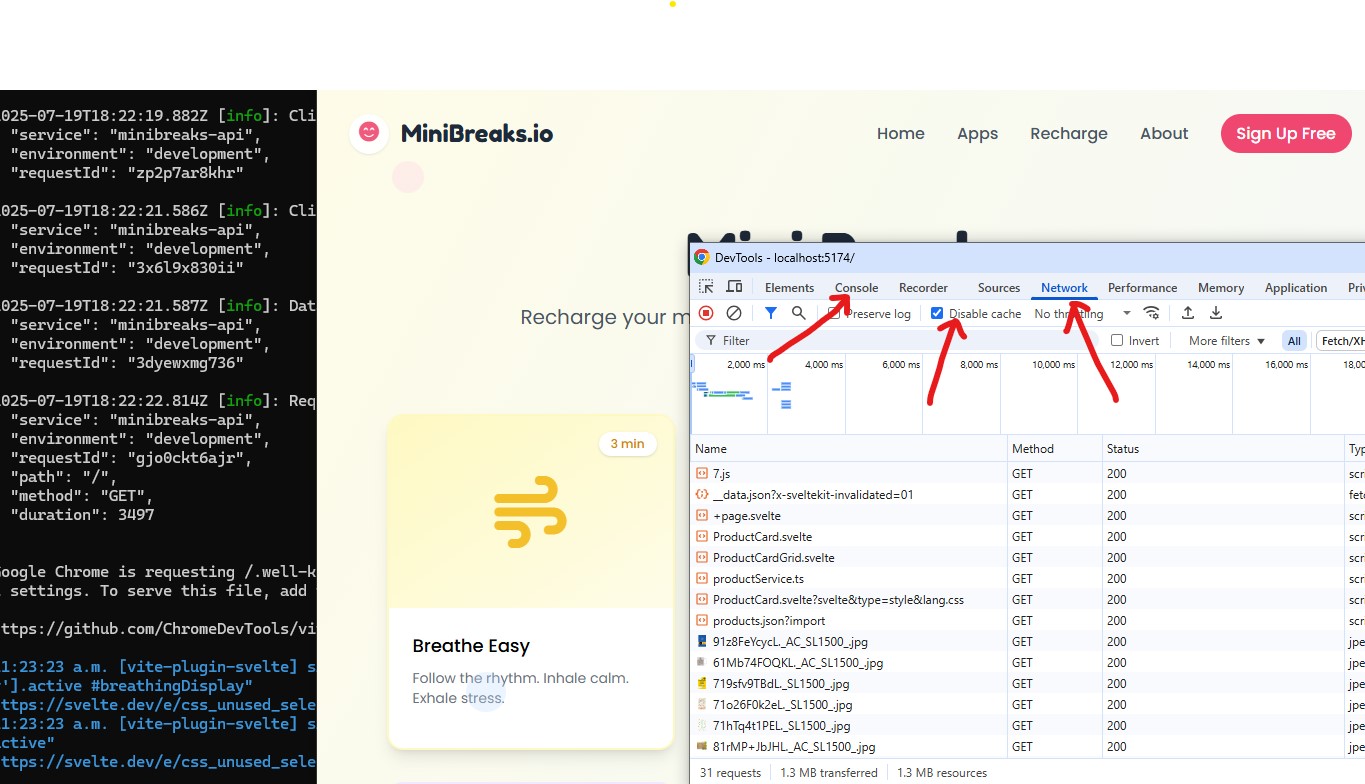
Debugging with AI Assistance
AI Debugging Prompt Template
"This [page/feature] isn't working as expected. Here's what I'm seeing: [describe the issue clearly]. Can you help me write a console log to identify the issue?"
Automation Testing (Optional)
- Playwright - Modern automation testing framework
- Cypress - Popular end-to-end testing tool
- Jest - JavaScript testing framework for unit tests
Security Check
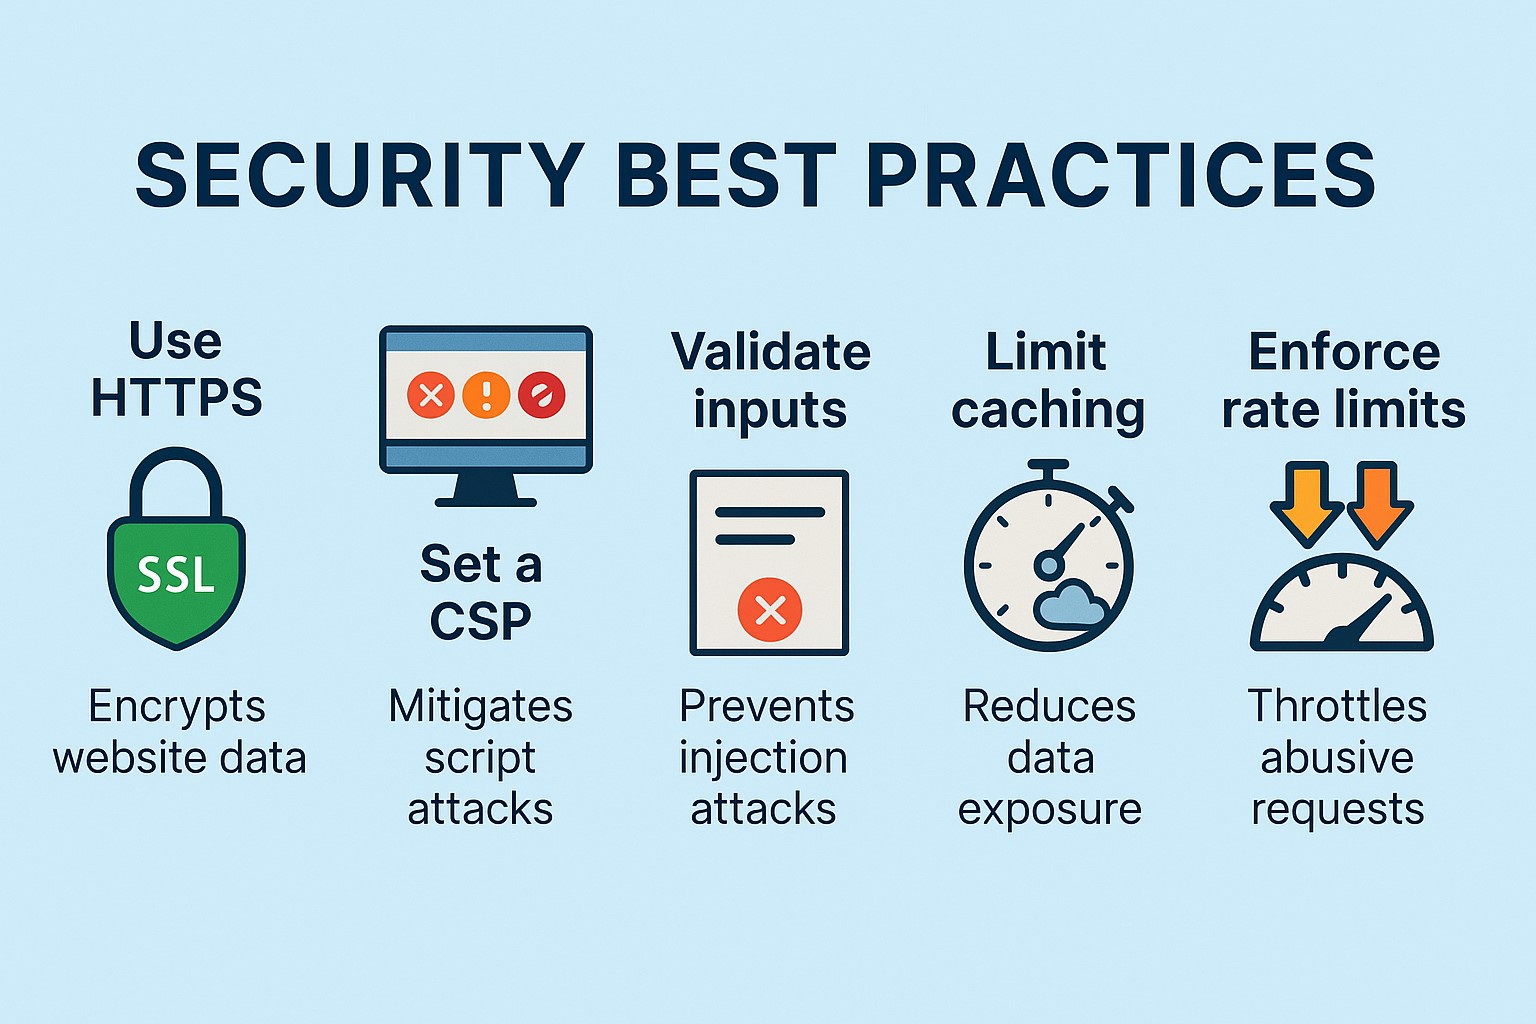
Common Security Measures
- CORS: Controls which domains can access your resources
- CSP: Prevents cross-site scripting attacks
- Input Validation: Protects against malicious data
- Rate Limiting: Guards against excessive requests
- SQL Injection Prevention: Secures database queries
Securing Sensitive Data
Never put sensitive information in your source code. This includes API keys, database passwords, secret tokens. Store these in environment files (.env) that are never committed to your repository.
Accessibility and Responsiveness
Accessibility Checks
- Color contrast: Ensure text is readable in both light and dark modes
- Keyboard navigation: All interactive elements should be accessible via keyboard
- Screen reader compatibility: Proper heading structure and alt text
- Focus indicators: Clear visual indication of focused elements
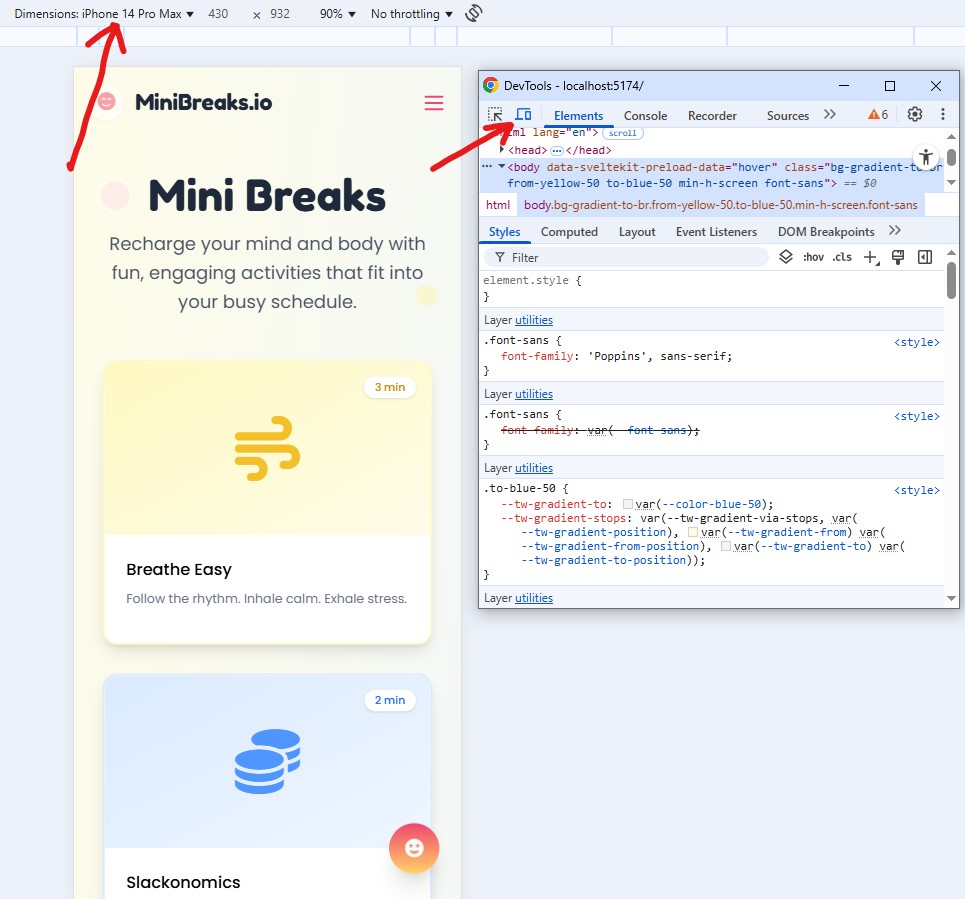
Responsiveness Testing
Your website should work beautifully on all devices. Test across different screen sizes, browsers, and orientations.
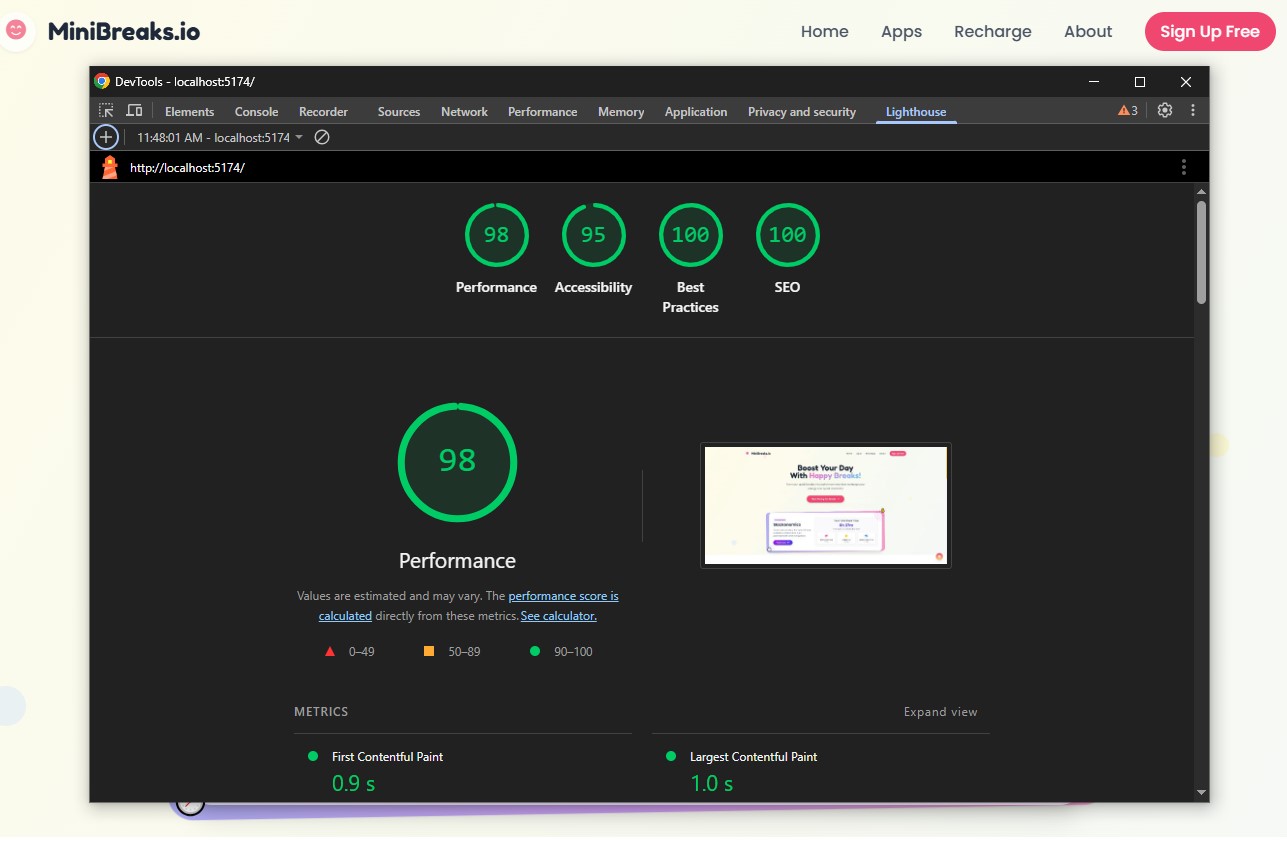
Performance Check
Using Lighthouse Tool
- Open your website in Google Chrome
- Press F12 to open Developer Tools
- Click on the "Lighthouse" tab
- Click "Analyze page load" to run the audit
- Review the suggestions and implement improvements
Performance Optimization
- Image optimization: Compress images and use modern formats
- Code splitting: Load only necessary code for each page
- Caching: Store frequently accessed data
- Minification: Remove unnecessary characters from code
SEO (Search Engine Optimization)
SEO Basics
- Keywords: Include relevant keywords naturally in your content
- URL structure: Keep URLs clear, short, and keyword-rich
- Internal linking: Link related pages together
- Site speed: Fast loading times improve search rankings
Meta Tags and Content
- Title tags: Descriptive and unique for each page
- Meta descriptions: Compelling summaries that encourage clicks
- Alt text for images: Describes images for screen readers and search engines
- Header structure: Proper use of H1, H2, H3 tags
Deployment Time
Deployment Options
- Vercel: Excellent for SvelteKit, React, and Next.js
- Netlify: Great for static sites and JAMstack
- Railway: Good for full-stack applications with databases
- DigitalOcean: More control with VPS hosting
- GitHub Pages: Free hosting for static sites
Pre-Deployment Checklist
- ✅ All manual testing completed
- ✅ Security measures implemented
- ✅ Environment variables properly configured
- ✅ Lighthouse performance score above 80
- ✅ Accessibility audit passed
- ✅ Responsive design tested on multiple devices
- ✅ SEO elements properly configured
- ✅ Error handling implemented
📋 Homework
Lessons Learned from Building with AI
9 min read
🧠 AI Still Needs Your Help
After months of building with AI, the most important lesson I learned is this: AI is a powerful tool, but it still needs human guidance.
Think of AI as a brilliant but inexperienced teammate. It can write code fast, but it doesn't always understand context, project goals, or the subtle requirements of a good user experience.
😤 Common Frustrations
Repetitive Suggestions
One of the most common issues I encountered was AI suggesting the same solution over and over, even when it didn't work the first time.
🔄 When AI gets stuck in a loop:
- Try rephrasing your prompt completely
- Provide more specific context about what went wrong
- Break the problem into smaller pieces
- Start a new conversation to reset the AI's context
Overcomplicated Code
AI sometimes generates overly complex solutions when a simpler approach would work.
💡 Keep it simple:
Always ask yourself: "Is there a simpler way to do this?" If the AI-generated code feels overly complex, ask it to simplify.
Wrong Assumptions
AI will sometimes make assumptions about your project, tools, or requirements that aren't correct. For example, it might assume you're using a library you haven't installed, or that your database structure is different from what it actually is.
📖 Case Studies from MiniBreaks.io
Case Study 1: The Dialog That Wouldn't Close
I was building a confirmation dialog for MiniBreaks.io — a simple modal that opens on user action and closes when the user confirms or cancels.
The AI generated a solution using a Svelte modal component, but the dialog wouldn't close when the user clicked "Cancel." I asked the AI to fix it — three times. Each time, it restructured the dialog component but the issue persisted.
Root Cause: The issue wasn't in the component — it was a timing conflict between the backdrop click handler and the button click handler. The AI kept changing the component structure because it didn't have enough context about event propagation.
Solution: I stopped the AI, looked at the event flow myself, added event.stopPropagation() to the Cancel button, and it worked instantly.
🎓 Takeaway
When AI keeps failing to fix an issue, step back and try to understand the root cause yourself. AI is great at generating code, but debugging often requires a higher-level understanding of how pieces fit together.
Case Study 2: Deployment Troubleshooting
After weeks of development, I was ready to deploy MiniBreaks.io. The AI suggested using a popular deployment platform and provided step-by-step instructions. Everything seemed fine — until I pushed my code and got a build error.
The AI tried to fix the error by modifying the build configuration, but each fix introduced new issues. It took me hours of back-and-forth before I realized the root cause: my Node.js version was incompatible with one of my dependencies.
🎓 Takeaway
Always check your environment configuration (Node.js version, dependencies) before troubleshooting code-level issues. Version mismatches are a common source of deployment problems.
✨ Pleasant Surprises
Despite the frustrations, there were genuine moments of surprise where AI exceeded my expectations:
🎨 Beautiful UI Generation
AI consistently produced clean, modern designs. The speed at which it could create responsive layouts with good typography was impressive.
📝 Documentation Quality
When asked to add comments or explain code, AI produced clear, helpful documentation that actually improved code readability.
🔧 Refactoring Assistance
AI was excellent at restructuring and cleaning up messy code, especially when given clear guidelines about the desired output.
💭 Reflection
Looking back at the entire journey, building with AI has been both challenging and rewarding. It's easy to get frustrated when things don't work, but it's equally easy to be amazed by how much you can accomplish in a short period with AI assistance.
The key is to maintain a learning mindset. When AI makes mistakes, use those moments to deepen your own understanding. When AI provides great solutions, study them to learn new patterns and techniques.
📓 Homework
The Future of AI-Assisted Development
7 min read
🔮 Series Reflection
You made it to the end of this series — and that's no small feat. We've covered everything from the very first "Can I really build something with AI?" question to deploying a real product and reflecting on lessons learned.
Let's take a moment to look at where AI development is headed and what it means for builders like us.
🚀 What's Next for AI Development?
AI tools are evolving at a breathtaking pace. Here's what I see coming:
🧠 Smarter Context Understanding
AI will get better at understanding entire codebases, not just individual files. This means fewer context-switching issues and more coherent suggestions.
🔗 Better Tool Integration
Expect tighter integration between AI and development tools — from design to deployment, AI will be woven into every step.
🎯 More Specialized Models
Instead of one-size-fits-all, we'll see AI models specialized for different frameworks, languages, and even types of applications.
⚠️ A Word on "Vibe Coding"
There's been a lot of hype about "vibe coding" — the idea that you can just describe what you want and AI will build it for you. While it's true that AI can generate a lot of code quickly, there's a dangerous trap here.
🚨 The Danger of Blind Trust
If you don't understand the code AI generates, you can't debug it, optimize it, or extend it. You're building on a foundation you can't see. That's not building — that's gambling.
The future belongs to people who can collaborate with AI effectively — who understand enough to guide it, question it, and improve upon its outputs.
🎓 Parting Advice
Start Building Today
Don't wait for the perfect idea or the perfect moment. The best way to learn is by doing.
Stay Curious
AI tools change fast. Keep experimenting, keep learning, and don't be afraid to try new approaches.
Build for People
Technology is a means to an end. Focus on solving real problems for real people, and the tools will follow.
Share Your Journey
Document what you learn. Others are on the same path, and your experience might be exactly what someone needs to hear.
🌱 What's Next for Me
I created this series to shorten the gap between having an idea and seeing it live. Building MiniBreaks.io was one of the most rewarding experiences of my career — and the most humbling.
I'll continue building, writing about my experiences, and exploring the intersection of human creativity and AI capability. If you've made it this far, you're already ahead of most people. Now go build something amazing.
📋 AI Development Cheat Sheet
Quick Reference Guide
🚀 Quick Start
- Pick an idea you're passionate about
- Use AI to brainstorm and refine it
- Generate a prototype with DeepSite
- Convert to SvelteKit with AI assistance
- Test, polish, and deploy
🧰 Essential Tools
- ChatGPT — Brainstorming & planning
- GitHub Copilot — Code completion
- Cursor — AI-powered IDE
- DeepSite — Design generation
- Lighthouse — Performance testing
⭐ Best Practices
- Be specific in your prompts
- Break complex tasks into small steps
- Always review AI-generated code
- Maintain a learning mindset
- Document your process
🚫 Common Pitfalls
- Don't blindly trust AI output
- Don't skip testing
- Don't ignore security basics
- Don't over-engineer early on
- Don't forget accessibility
💡 Pro Tips
- Start new conversations for fresh context
- Cross-reference AI answers with documentation
- Use AI for debugging, not just generation
- Keep your environment updated
- Build iteratively — ship early, improve often
🎯 Closing Thought
"AI makes the fast things faster. Your job is to bring the wisdom — the decisions, the empathy, the judgment that turns code into products people love."
You've Completed the Series!
Thank you for reading "How I Built MiniBreaks.io With AI" — all 10 parts. I hope this series has inspired you to start building with AI.
Back to Series Overview